
User guide
Every step to get the most out of KiloTax, profile by profile: from signing up to reporting an accident.
The illustrations are simplified representations of the app: the actual screen may differ slightly depending on your phone and app version.
Before you start
KiloTax measures your trips by GPS, keeps your vehicle invoices and calculates the business share to report. This guide covers each profile, from signing up to reporting an accident.
Choose your profile
| Profile | Who it’s for | What it does in the app |
|---|---|---|
| Self-employed | You use your vehicle for your own business | Trips, invoices, estimated deduction, reports for your accountant |
| Employee (personal vehicle) | You use your vehicle for your employer | Trips, expense claim or employment deduction, reports |
| Fleet manager | You run a business with several vehicles | Vehicles, driver invitations, schedules, fleet tracking and reports |
| Driver | Your employer invited you with a code | Trips, invoices and accident reports for the vehicle you drive |
The tabs
| Tab | Content | Who sees it |
|---|---|---|
| Dashboard | Kilometres, expenses, estimated deduction, reports | Everyone |
| Trips | Start and stop a trip, history for the year | Everyone |
| Vehicle | Fuel, garage and parts invoices, odometer reading | Everyone |
| Fleet | Company vehicles, invitations | Fleet manager |
| Incidents | Report an accident, view your reports | Everyone |
| Data | Charts by day, week, month or year | Self-employed and fleet manager |
| Settings | Profile, vehicle, Bluetooth, working hours, help | Everyone |
Phone permissions
Grant these permissions when the app asks for them; otherwise your trips won’t be measured correctly.
- Location: “Allow all the time”. The trip keeps being measured when the screen is locked or you’re in another app.
- Nearby devices (Android). Needed to recognize your vehicle’s Bluetooth.
- Notifications. Without them, your phone won’t show the trip in progress.
- Physical activity (Android). Used to end a trip when you leave the vehicle.
- Camera. To photograph receipts and accidents.
Self-employed
You track your own vehicle: trips, invoices, estimated deduction and reports for your accountant.
Sign up
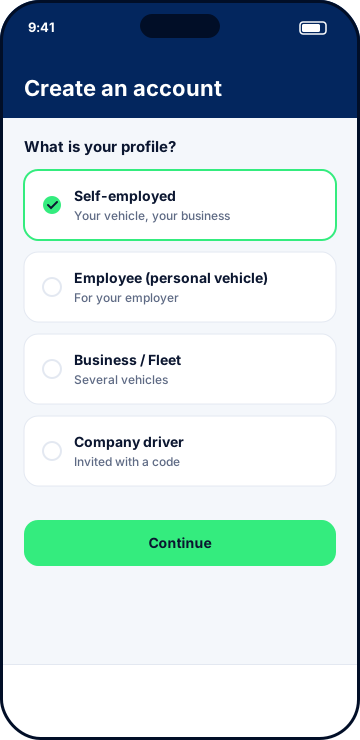
- On the sign-in screen, tap “Click here to sign up”.
- Enter your first name, last name and email, then choose the “Self-employed” profile.
- Enter your vehicle’s licence plate number. It is printed on your reports.
- Complete your details: date of birth, phone, province or territory, business name, password.
- Tap “Get my verification code” and enter the 6-digit code you receive by email. It is valid for 5 minutes.
- On the “Before you start” screen, check the first two boxes (age of majority, estimates and terms), then tap “Continue”.
To sign in again later: choose the Self-employed space, enter your email and password, then the 6-digit code.
Set up your vehicle
In Settings:
- Vehicle: make, model, year, monthly insurance amount (0 if none) and financing type. Financing requires Premium.
- Taxes: turn on “Registered for taxes (GST/QST)” if that applies to you. Expenses are then counted before tax.
- Mileage: the CRA per-kilometre rate, which you can change.
- Working hours: they determine how trips are classified automatically.
- Automatic start: link your vehicle’s Bluetooth (see Common features).
Record a trip
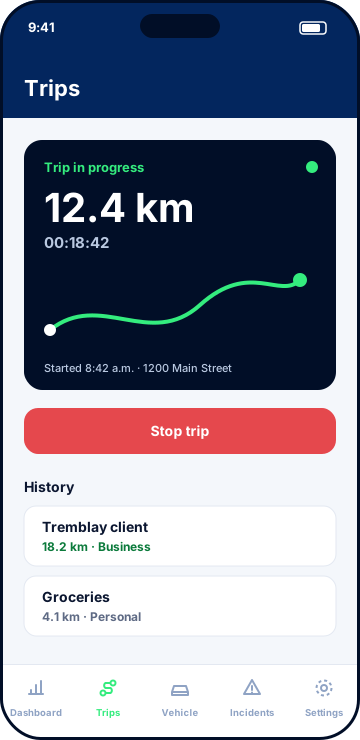
- In the Trips tab, tap “Start a trip”. The app records your location and starting address.
- Drive. The trip continues with the screen locked.
- When you arrive, tap “Stop trip”.
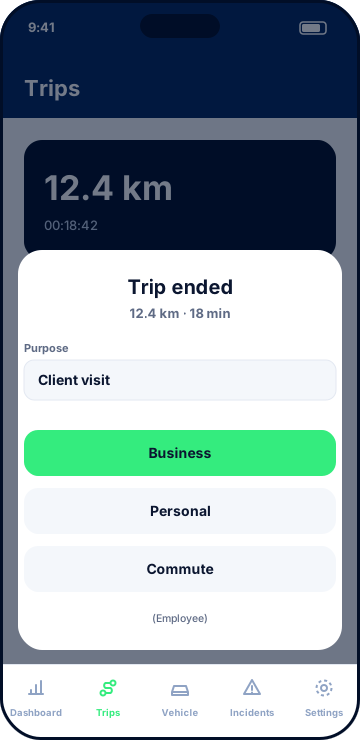
- In the “Trip ended” window, enter the purpose, then choose Business or Personal.
A long press on a trip in the history deletes it. The free plan allows 15 trips per month.
At the end of the trip, the “Trip ended” window asks for the purpose and the classification. The “Commute” option only appears for the Employee profile.
Add an invoice
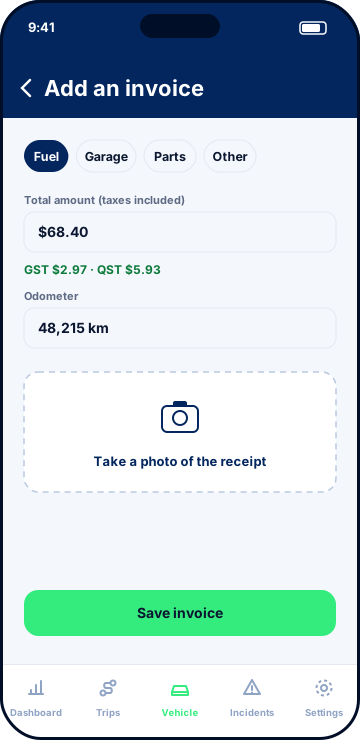
- In the Vehicle tab, tap “Add an invoice”.
- Choose the type: Fuel, Garage, Parts or Other.
- Enter the total amount paid, taxes included. GST and QST are calculated for you.
- Add the odometer reading and tap “Take a photo of the receipt”.
- Tap “Save invoice”.
Track your deduction and export
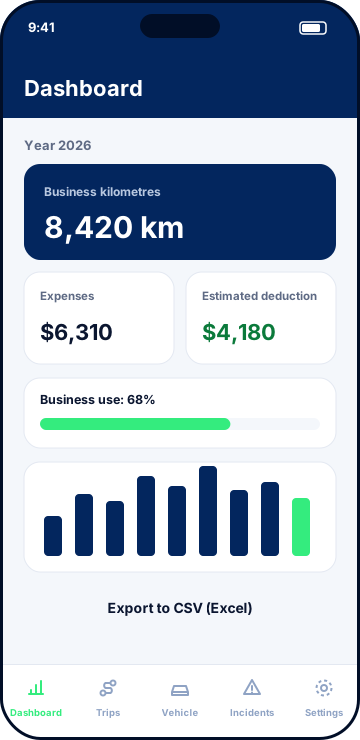
The Dashboard shows your business kilometres, expenses and estimated deduction for the year. Tap a card to see the details: in Mileage, each trip shows its times and “Change classification”.
For your accountant, tap “Export to CSV (Excel)” or “Generate PDF report with receipts”. Exports require Premium. The Data tab shows the same figures as charts.
Report an accident
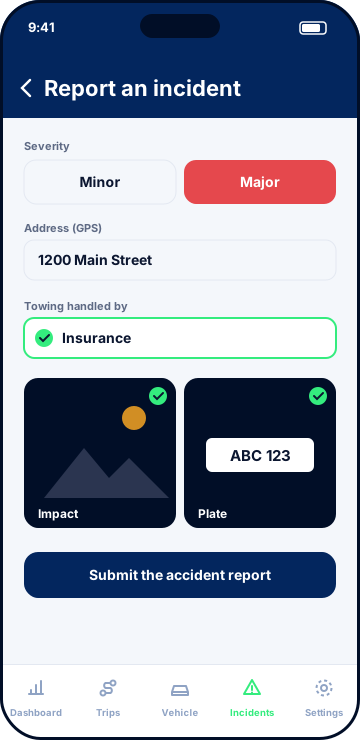
- In the Incidents tab (or Settings → My vehicle), tap “Report an incident”.
- Choose the type of obstacle and the severity: Minor (the vehicle can be driven) or Major (vehicle immobilized).
- Check the address, pre-filled by GPS and editable.
- Indicate who handles the towing. It is mandatory for a major accident.
- Take the two required photos: the impact and the licence plate.
- Tap “Submit the accident report”.
The report stays on your phone, for your insurer. After a major accident, no trip can start until you tap “Put the vehicle back in service”. For a breakdown without an accident, use the “Mechanical breakdown without an accident?” link in Settings → My vehicle.
On the free plan, you can report an accident, but viewing or exporting the report requires Premium.
Employee (personal vehicle)
You use your own car for your employer: KiloTax prepares the monthly expense claim or estimates your employment deduction.
Sign up
- On the sign-in screen, tap “Click here to sign up”.
- Enter your first name, last name and email, then choose the “Employee (personal vehicle)” profile.
- Complete your details and password. The Employer field is optional; no business number is required.
- Enter the 6-digit code you receive by email, then accept the “Before you start” screen.
You can add your employer’s name later in Settings → My profile. It is printed on your expense claims.
Choose your situation
Open Settings → Vehicle → “Employee: expense claim and deduction”, then choose under “Your situation”:
| Situation | When to choose it | What KiloTax produces |
|---|---|---|
| Reimbursement | Your employer reimburses your kilometres | The monthly expense claim to give them |
| Deduction | You pay your expenses yourself | An estimate of the deduction (T777, and TP-59 in Quebec) |
In Reimbursement mode, enter your employer’s per-kilometre rate. If you leave it blank, the claim uses the CRA reasonable rate.
Record your trips
Trips start and stop as for a self-employed worker, in the Trips tab. At the end of a trip, you have a third choice: “Commute”. These trips are personal and are excluded from the expense claim.
Monthly expense claim
The Employee screen shows the month’s expense claim: business kilometres, parking and tolls, and the total to be reimbursed. Use the arrows to change months.
- Add parking or a toll under “Other vehicle expenses”. Dates are entered in YYYY-MM-DD format.
- Export the claim with “PDF report” or “CSV file (Excel)”.
Employment deduction
In Deduction mode, the screen shows the estimate for the year. To keep it accurate:
- enter fuel, maintenance and insurance as usual, in the Vehicle tab and in Settings;
- add amounts received from your employer with “Add a reimbursement”: they are subtracted;
- if you bought the vehicle, enter its price under “Vehicle purchase (capital cost allowance)”.
The deduction requires a form signed by your employer (T2200). Without it, the deduction is generally not possible.
Second vehicle and subscription
The free plan allows 15 trips per month. The Employee subscription removes this limit and lets you add a second vehicle under “Employee vehicles”.
Report an accident
The steps are the same as for a self-employed worker: Incidents tab, “Report an incident”, severity, address, towing, two photos, then “Submit the accident report”. The report stays on your phone, for your insurer.
Fleet manager
You create the company’s space, invite your drivers with a code and track the vehicles, expenses and accidents of the whole fleet.
Create the Business account
- On the sign-in screen, tap “Click here to sign up”.
- Enter your first name, last name and email, then choose the “Business / Fleet” profile.
- Enter the company name. This is the name your drivers will enter to join you.
- Enter the company number (Canadian BN / NEQ), 9 or 10 digits, and the number of vehicles in the fleet.
- Complete your details and password, then enter the 6-digit code you receive by email.
- Last, mandatory step: choose a security question and its answer. The account is only created once the answer is saved.
To sign in again: email, company name and password, then the 6-digit code and the answer to your security question.
Invite a driver
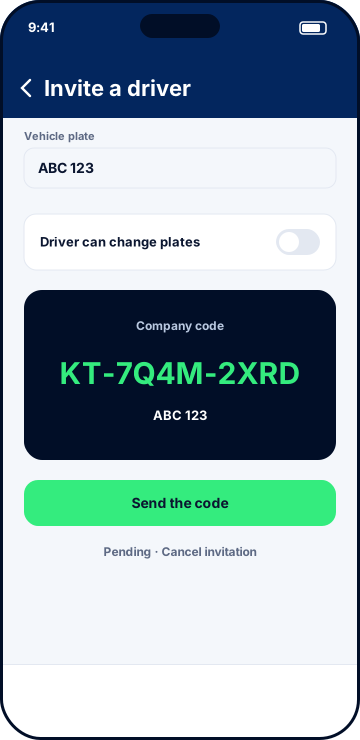
- In the Fleet tab, tap “Invite a driver”.
- Enter the licence plate of the company vehicle. The driver will receive it automatically when signing up.
- Choose the vehicle type with the “Driver can change plates” option:
- off: assigned car, plate locked on the driver’s side;
- on: shared cars, the driver indicates which vehicle they take.
- If you know it, add the vehicle’s Bluetooth, that is, the name the car displays.
- Tap “Generate code”. A company code KT-XXXX-XXXX appears.
- Tap “Send the code” to share it by text or email. The message includes the company name, the code and the plate.
Each code works for one driver only. Until it is used, the invitation stays “pending” and you can tap “Cancel invitation”: the code stops working immediately.
Set up each vehicle
In the Fleet tab, tap a vehicle to open its page. Only you can change:
| Setting | Effect |
|---|---|
| Licence plate | Plate printed on the vehicle’s trips and reports |
| Vehicle Bluetooth | As soon as a driver connects to it, the vehicle is recognized and the trip starts |
| Driver plate | Assigned car or shared cars |
| Working hours | A trip that ends during these hours is classified as business |
| Monthly insurance | Premium added on the 1st of each month, counted in the deduction |
| Financing | Lease or loan interest, with CRA limits |
Drivers decide for themselves whether their trips are recorded outside working hours. This choice protects their privacy and is not yours to make.
Track the fleet
- Fleet tab: each vehicle shows its status (Driving, Stopped, Offline), its business kilometres and its deduction. Tap it to open its driver’s dashboard.
- Dashboard: the “My fleet” view adds up all vehicles, including yours.
- Data tab: fleet rankings (distance, fuel per 100 km, accidents, deduction).
- Consolidated report: tap “Export the fleet consolidated report” for an Excel (CSV) file or a PDF with your logo, sorted by driver with subtotals.
You also have your own vehicle: trips, invoices and accident reports work as for a self-employed worker.
Fleet accidents
When a driver reports an accident, you receive the report immediately.
- In the Fleet tab, the vehicle turns red (“Damaged / Out of service”) for a major accident, or shows a yellow badge for a minor incident.
- The Incidents tab opens “Accident management”: all reports, filtered by All, Major or Minor.
- Tap a report to read it, or “Insurance PDF” to export it for the insurer.
- Once the vehicle is repaired, you or the driver tap “Put the vehicle back in service”.
A damaged or broken-down vehicle can no longer start any trip, but it is still billed until it is removed from the fleet.
Remove a vehicle and manage the company
- Remove a vehicle: trash icon in the list, with confirmation. Its driver’s access is revoked immediately; expenses up to that date remain in the year.
- Rename the company: Settings → Company, with the answer to your security question. Let your drivers know: they will need to enter the new name to sign in.
- Fleet subscription: $12.49 per month per fleet vehicle, billed to your account. Unlimited trips and exports are included for the whole team.
Driver
You join the company with the code your employer sent you; your trips, invoices and accident reports then reach them automatically.
Join your company
You need your employer’s invitation message: the company name and the code KT-XXXX-XXXX.
- On the sign-in screen, tap “Click here to sign up”.
- Enter your first name, last name and email, then choose the “Company driver” profile.
- Enter the company code. The KT- prefix is already shown: type the remaining 8 characters. The app shows “Valid code”.
- Enter the company name exactly as it appears in the invitation.
- The plate assigned by the company appears automatically. It cannot be changed.
- Complete your details and password, then enter the 6-digit code you receive by email.
- Accept the “Before you start” screen.
To sign in again: email, password, the company code you signed up with and the company name, then the 6-digit code.
What your employer sets
The company name, per-kilometre rate, taxes, working hours and vehicle insurance are read-only. You don’t have a Data tab. Unlimited trips and exports are included by your company.
Your vehicle
- Assigned car: the plate is locked in your Settings. Only your employer can change it.
- Shared cars: in Settings, tap “Change vehicle” and enter the plate of the vehicle you’re taking. It must be registered in the fleet.
Record your trips
- Manually: Trips tab, “Start a trip”, then “Stop trip” and choose Business or Personal.
- Automatically (Android): in Settings → Automatic start, link the vehicle’s Bluetooth. The trip starts when the phone connects, stops when it disconnects and is classified according to your employer’s working hours.
Your privacy
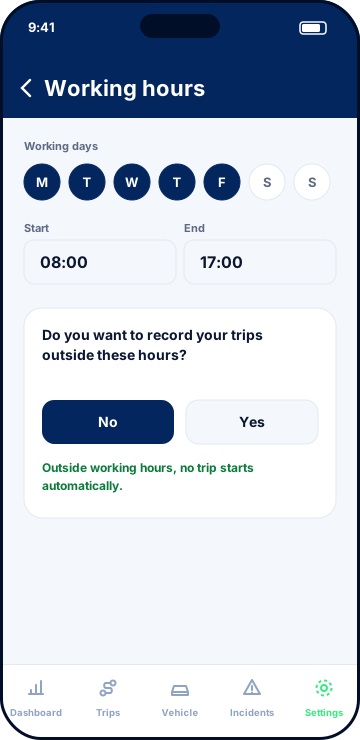
In Settings → Working hours, you are the one who answers “Do you want to record your trips outside these hours?”. The answer is “No” by default: outside working hours, no trip starts automatically. Your location is only shared with the company during working hours.
Add an invoice
Vehicle tab, “Add an invoice”: type, amount including taxes, odometer and receipt photo. The invoice and its receipt are sent to your company.
Report an accident or a breakdown
- Get to safety, then open the Incidents tab (or Settings → My vehicle) and tap “Report an incident”.
- Choose the type of obstacle and the severity: Minor (light damage, the vehicle can be driven) or Major (vehicle immobilized, towing mandatory).
- Check the accident address, pre-filled by GPS.
- Indicate who handles the towing: the insurer, another service, or both.
- Take a photo of the impact and a photo of the licence plate.
- Tap “Submit the accident report”. All fields are mandatory.
Your employer receives the report immediately.
| Severity | What happens |
|---|---|
| Minor | The vehicle stays in service and automatic tracking continues. Once settled, tap “Minor incident settled: remove the report”. |
| Major | The current trip is saved, the vehicle is out of service and no trip can start. No other accident can be reported until it is back in service. |
For a breakdown without an accident, tap “Mechanical breakdown without an accident?” in Settings → My vehicle, then “Remove from service”. When the vehicle is repaired, you or your employer tap “Put the vehicle back in service”.
If access is denied
If your employer removes your vehicle from the fleet, your access is revoked. Ask them for a new invitation, then sign in with the new code and the company name.
Common features
The screens are the same on iPhone and Android; only automatic trip start is Android-only.
iPhone and Android
| Feature | Android | iPhone |
|---|---|---|
| Sign-up, sign-in, profiles | Yes | Yes |
| Trip started and stopped manually | Yes | Yes |
| GPS tracking with the screen locked | Yes, location “Allow all the time” | Yes, location “Always” |
| Automatic start with the vehicle’s Bluetooth | Yes | No: iOS doesn’t notify apps when the phone connects to a car’s Bluetooth |
| Automatic stop when you leave the vehicle | Yes | No: stop the trip manually |
| Invoices, receipts, reports, accidents | Yes | Yes |
On iPhone, start and stop each trip from the Trips tab.
Automatic start with Bluetooth (Android)
Once the vehicle’s Bluetooth is linked, the trip starts when the phone connects to it and is saved when it disconnects.
- Turn on your phone’s Bluetooth and pair it with the car in Android’s Bluetooth settings.
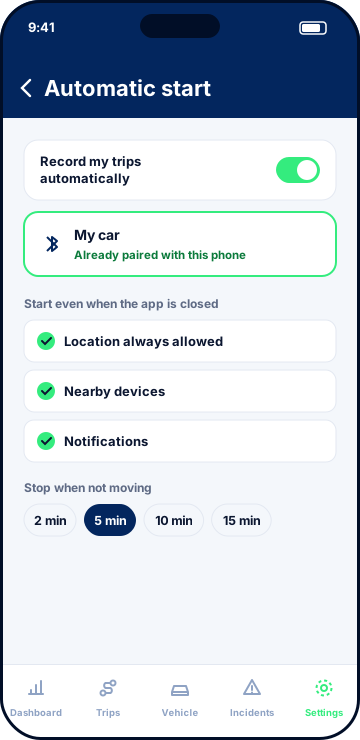
- In KiloTax, open Settings → Automatic start and tap “Add a Bluetooth device”.
- Choose the car from the list. It shows “Already paired with this phone”. Tap Confirm.
- Accept the Android window asking you to allow KiloTax to manage this device.
- Check that “Record my trips automatically” is turned on.
- Under “Start even when the app is closed”, each line must have a green check: location always allowed, nearby devices, notifications.
An automatic trip classifies itself: business if it ends during your working hours, personal otherwise. A trip started manually is never interrupted by an automatic trip.
If the phone stays in the parked car, the trip ends after the time chosen under “Stop when not moving” (2, 5, 10 or 15 minutes). The end time recorded is the time of the last movement.
Working hours and privacy
In Settings → Working hours, set the start, end and working days. Night shifts are supported.
Below the hours, answer “Do you want to record your trips outside these hours?”:
| Answer | Effect |
|---|---|
| No (default) | Outside working hours, no trip starts automatically. Your personal travel is not tracked. |
| Yes | Trips start automatically at any time. Outside working hours, they are classified as personal. |
Either way, you can always start a trip manually. A trip that starts during working hours ends normally, even after they’re over.
Correct a trip
- Classification: Dashboard → Mileage card → tap the trip, then choose Business or Personal. Automatic trips can also be corrected with one tap in the Trips tab.
- Distance: a trip marked “incomplete tracking” missed some GPS positions. Tap it to enter the correct distance; the measured distance is kept.
- Deletion: long press on the trip in the Trips tab.
If a trip doesn’t start on its own
| Check | Where |
|---|---|
| Your phone’s Bluetooth is on and the car is paired | Phone Bluetooth settings |
| A Bluetooth device is linked to the vehicle | Settings → Automatic start |
| The time is within your working hours, or the “outside hours” answer is Yes | Settings → Working hours |
| The vehicle is in service | Settings → My vehicle |
| No trip is waiting to be classified | Trips tab |
| Location is set to “Allow all the time” | Phone settings → Apps → KiloTax |
Some brands (Oppo, Realme, OnePlus, Xiaomi, Samsung) close apps running in the background. Settings → Automatic start then shows a card with brand-specific settings: allow background activity and auto-launch for KiloTax, then lock the app in your recent apps.
Forgotten password and help
- Forgot your password? on the sign-in screen: enter your space’s details, receive the code, then choose a new password. Fleet managers also answer their security question.
- Help and support in Settings: frequently asked questions and a “Contact support” button, with your account’s support code. You can also use our Support page.
- Sign out: Settings → Account. You stay signed in until you sign out.
Need help?
Write to us from the app (Settings → Help and support) or at supportkilotax@ontadigital.com.
See the FAQ →